Resources
ICOM Automagic
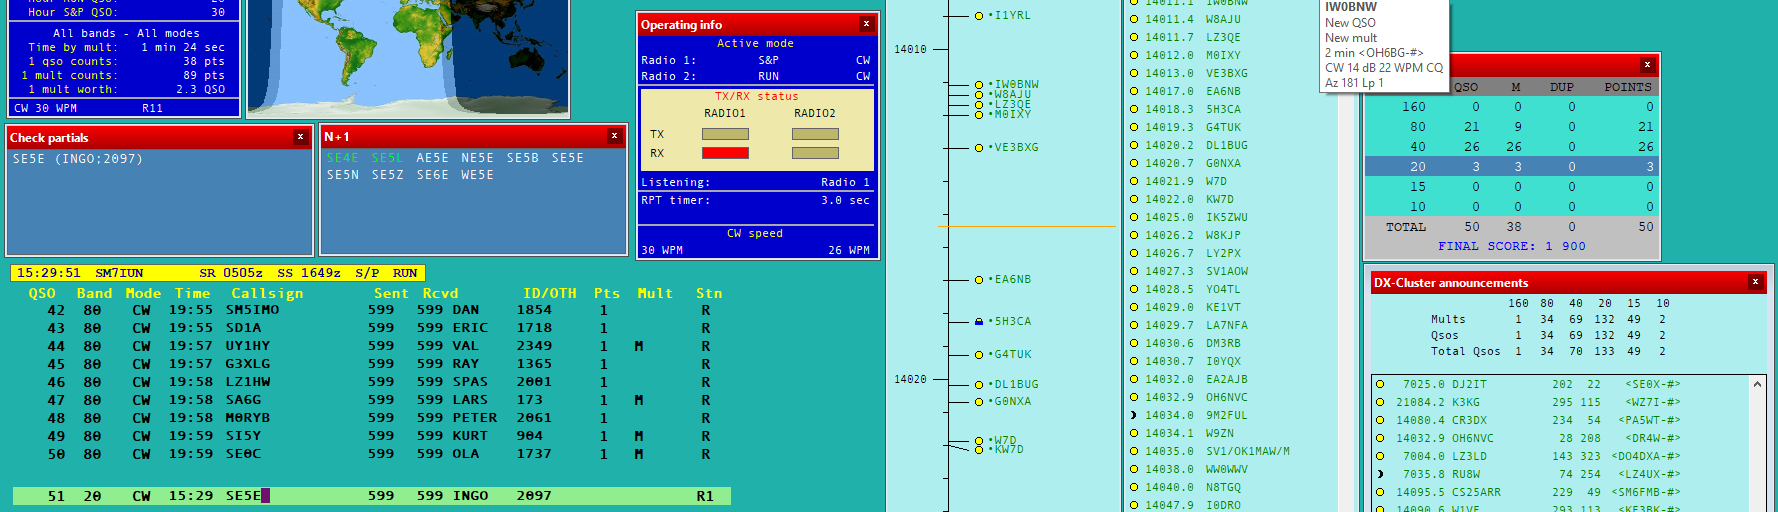
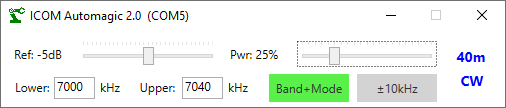
A Windows utility with small screen footprint that use the radio information broadcast over UDP from N1MM Logger+ or DXLog.net to update spectrum scope settings and output power on a range of ICOM radios.
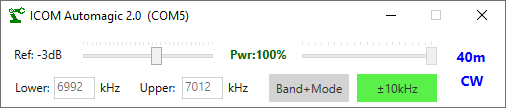
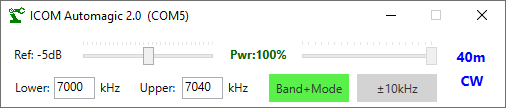
It sets and remembers waterfall/spectrum edges, display reference level, and output power for each used frequency band and operating mode and also offers a zoomed-in display mode with user configurable width, centered around the current operating frequency, with its own dedicated reference level setting.
Settings are controlled using two input boxes for frequency (requiring pressing RETURN for entry, with erroneous input silently ignored) and sliders for reference level and output power. Clicking the power level percentage number toggles “barefoot” mode which sets radio output power to 100% at activation and then re-sets it to 100% whenever band or mode changes.
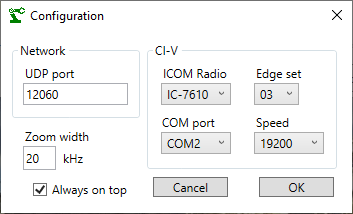
To save screen real estate, the configuration of the application is hidden, available by right-clicking the zoom button in the lower right corner.
A typical usage scenario is to connect ICOM Automagic to the “Remote” CI-V port of the ICOM radio while the logger is connected to the fast USB CI-V port. (The two ports thus need to be unlinked in the radio settings.)
Note that the application does not query the radio for settings. Any manual changes made using the radio’s own controls are ignored and are thus not saved.
To use the application you need to enable XML broadcast from the logger.
In DXLog.net this is done with the Options|Broadcast|Radio information menu item. Make sure the correct IP address and port are set in Options|Configure network and that the port is the same as in ICOM Automagic’s XML broadcast setting. The default is 127.0.0.1 and 12060.
With N1MM Logger+ you need to check the “Radio” box on the “Broadcast data” tab in N1MM Logger+’s Configuration panel. Also here, make sure the UDP port is the same in both N1MM Logger+ and ICOM Automagic.
Please note that N1MM Logger+ reports the main receiver’s frequency when broadcasting frequency information. This means e.g. cross band SO2V is only possible with DXLog, not with N1MM Logger+.
Should you want to make modifications, the application is easily cloned and built using Visual Studio. There is also a released binary available via the GitHub link below.
ICOM Automagic executable on GitHub
Gateway for Club Log’s Live Stream
DXLogStream is a Windows utility (which can run minimized) that listens to the logged QSO information broadcast over UDP from DXLog.net and uploads logged QSO to Club Log for display using its Live Stream feature. Typical use cases are DXPeditions, IOTA activation, Special event stations, etc.
The utility requires a valid Club Log account with the used station call sign registered.
Networking must be enabled with Options->Enable Network. UDP networking must be enabled and the station ID and
used port must be the same as set in Options->Configure network. Settings are saved by hitting ENTER or clicking the Save button. Please note that if the UDP port setting is changed, the utility needs to be restarted.
The station callsign entered into the text box is the one used for the QSO upload. DXLog.net does not convey this as part of the logging information via UDP, which means that the corresponding setting in DXLog.net’s contest configuration is ignored.
Read more about Club Log Live Stream here.
Since the creation of this app, Michael G7VJR, has developed a much more powerful gateway which can be downloaded here.
Link to executable file: DXLogStream

Script Kit
The previously published script kit for ICOM is largely redundant since its features are now part of DXLog.net.
The script linked to below kit offers some help ful and some experimental scripts such as keyer speed synchronization and keyboard filter switching for ICOM and antenna switching for Yaesu.
The script kit is developed in Visual Studio 2019 which is the recommended SDK for designing scripts for DXLog.net.
By adding references to the DXLog.net executable and its key DLL files, Visual Studio’s Intellisense offers great help in writing and debugging scripts.
Script kit on GitHub
Educational script examples by the DXLog.net developer team
Introduction to DXLog.net scripting
Custom Forms
DXLog.net offers a unique customization ability in that you can design your own “subwindows” also referred to as Forms. A Form can contain information, data or metrics that you do not get from one of the standard DXLog.net windows. On the DXLog.net web site you can download example code for a single custom form.
A custom form is installed as a DLL file in a subfolder to DXLog.net‘s installation folder. Contrary to DXLog.net script files, this means you have to compile your code into an executable binary.
Some (hard earned) advice for designing custom Forms in DXLog.net:
- To write, modify and compile custom Forms you need to install Visual Studio. The “Community” version is free for personal use.
- The example code should be opened through its solutions file (.sln)
- If you can not see the code, right click on the Form and select “view code”
- Just as with the scripts, you need to add proper references to relevant parts of the DXLog.net binaries such as
DXLog.net.exe,DXLogDAL.dlletc. Without this, Visual Studio Intellisense will complain about e.g. variable names not being available and you will not be able to build. - Make sure Visual Studio is set up to build for x86. (Click on the selection arrow where it says “any CPU” and change to “x86”)
- The shortcut key to building the binary is Shift-Ctrl-B.
- If it does not already exist, create a folder called “CustomForms” in the DXLog.net installation folder (typically
C:\Program Files (x86)\DXLog.net) - Copy the created DLL file (located in
...DXLCusFrm1\bin\x86\Debugor similar, depending on your settings.) to the CustomForms folder. - Start DXLog.net and find a new drop-down menu called “Custom” between “Windows” and “Help”. Use it to activate your new custom Form.
You can contain as many custom Forms as you like in a single DLL but they must
- Have different names (of the KForm)
- Have different FormsID (change both in the CusFormID method for the class and in the Forms property)
Below you can download an extended version of 9A5K’s example code containing three separate custom Forms.